|
_______________________
Rob Galanakis |
HLSL Shaders
The OGRE shaders have 2 or 3 lights in a single pass, in order to save rendering passes, which is less of a problem where performance is not an issue. On the other hand, the 3dsmax/ShaderFX are usually set up for 3 lights done in multi-pass (FXComposer is set up for 1 light). The FXComposer .fx file is well documented, the other shaders are usually not documented in the code, so if you have a question what something is or why I do it, check out the fxcomposer file.
One more note concerning the OGRE files. I've taken them from the tech demos at www.bloodandirongame.com and thus are not entirely self-contained. There is one master .program file, and there are a couple shared vertex shader .hlsl files that the materials use in conjection with unique pixel shader files. A little work though and you should be able to figure it all out easily enough. I've also written a tutorial on .fx files and OGRE materials you can find on my Tutorials page.
Shaders 1 through 3, as well as numerous additional ones (more standard bump/spec shaders), are available in OGRE material format, available from the Blood and Iron Tech Demo, at www.bloodandirongame.com
Finally, don't forget to check out the Common Functions page for some neatly packed HLSL lighting and other functions.
skinHero (Download)
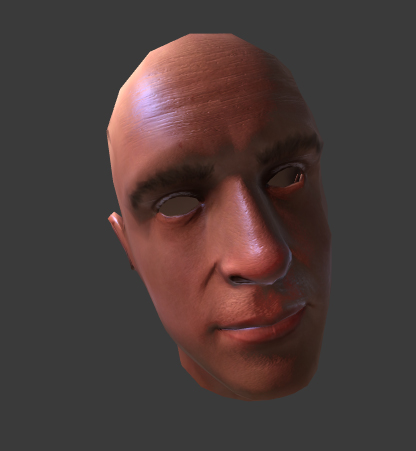
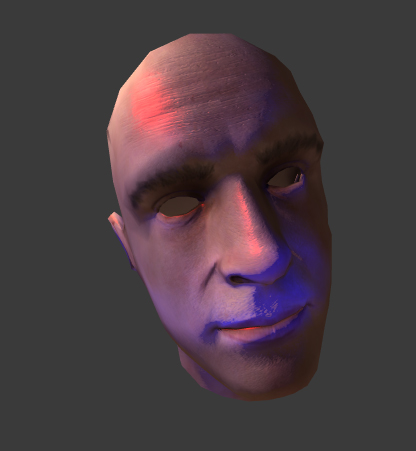
The skinHero shader is designed for human skin, specifically the face, and replicates the unique properties of rim lighting, sub-surface scattering, and pore-level detail. Despite its visual fidelity, the shader is cheap (50 pixel shader instructions only), and uses less texture memory than a traditional normal-mapping shader with three 24-bit maps.
diffuseLight Texture: This is your color texture, it should be mostly void of lighting detail. An ambient occlusion map is held in the alpha channel.
normalSpecular Texture: This is a normal map. Note, this normal map should NOT have any high-frequency or small scale detail, as this will interfere with the micro-normal maps. It should, however, have wrinkles and unique skin detail. The alpha channel holds a specular level mask, which also functions as the gloss mask. Both use multipliers to get the final effect.
poreSSS Texture: This is the unique aspect of the skinHero shader. The RGB channels hold pore masks. White in the R channel is where the "striated wrinkle" micro-normal goes, such as the forehead and neck. Black in the R channel is where the "pore" MN goes, such as the nose. White in the G channel is where the "bumpy" MN goes, such as the beard area. White in the B channel is where there is no micro-normal detail, such as the ears, and this can also be used to "tone down" the effect of the other MN maps. The alpha channel holds the subsurface scattering texture, where the whiter something is, the more SSS it has. Should be 1/2 or 1/4 full size.
mn Textures: These are the micro-normal textures. It is suggested the provided textuers are used, though you can make your own, perhaps for unique effects.
ambCube Texture: This shader uses a diffusely convolved ambient cube map for ambient lighting.
specColor: This is the color of the specular highlights.
sssColor: This is the color of those areas where SSS contributes, especially on the ears, nose, and mouth area. The melanin color.

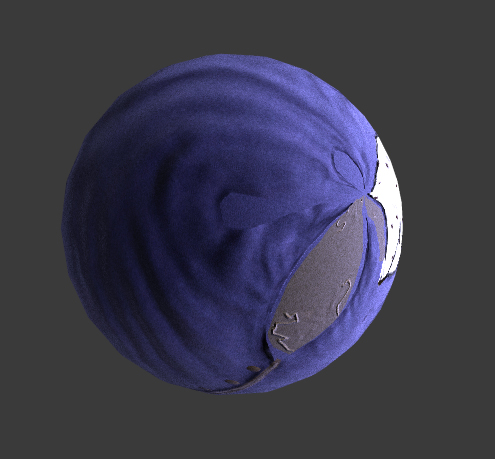
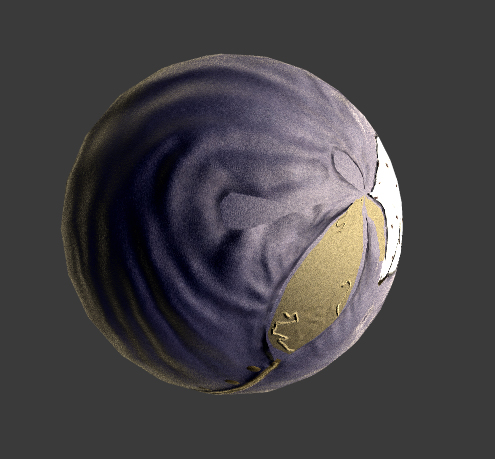
velvet (Download)
The velvet shader simulates the rim/fresnel lighting effect and softened specular highlights of cloth like velvet. It uses a micro-normal and micro-specular map, meaning that fiber-level detail should be left out of the normal map. The specular level (normal alpha) can be multiplied by a color to produce a colored specular highlight, which is very important for the rim lighting on certain materials.
diffuseLight Texture: This is your color texture, it should be mostly void of lighting detail. The ambient occlusion is held in the alpha.
normalSpec Texture: This is a normal map. It should not contain fibre-level detail. The specular level is held in the alpha channel, and it is multiplied by the specColor variable.
microTexture: The RGB holds the micro-normal map, it should be specific for the type of weave of the fabric. The alpha channel holds the micro-specular, which should be noise corresponding to the weave/MN, as it 'breaks up' the specular highlight by multiplying
micro-normal Textures: This is a generic looking "pore" texture.
ambCube Texture: This shader uses a diffusely convolved ambient cube map for ambient lighting.
specColor: This is the color of the specular highlights.
sssColor: This is the color of those areas where SSS contributes, especially on the ears, nose, and mouth area. The melanin color.
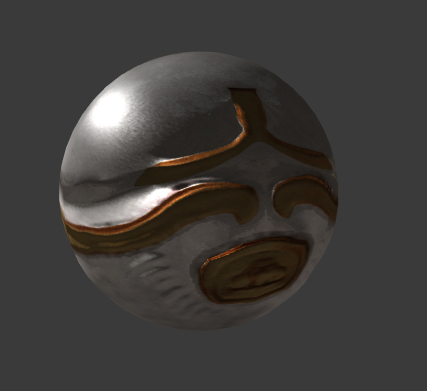
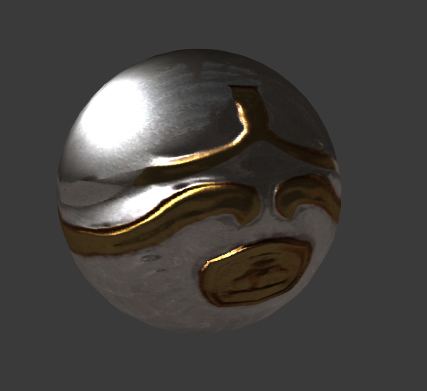
metal (Download)
The metal shader simulates reflective metals. It has a 24-bit specular map, dual specular highlights (one tight and saturated, one broad and duller), and a mask for reflection (shinier areas get non-blurry reflections). Despite the number of maps required, this is a relatively cheap shader.
diffuseLight Texture: This is your color texture, it should be mostly void of lighting detail. It holds an ambient occlusion map in the alpha.
normal Texture: This is a normal map.
specularRefl Texture: This is the 24-bit specular. It should be quite saturated in color. The alpha holds the reflection mask, where lighter tones correspond to higher reflectivity.
ambCube Texture: This is a diffusely convolved cube map, for ambient lighting.
reflCube Texture: This a "regular" cube map, for reflections in the ambient lighting pass.
specColor: This is the color of the specular highlights.
sssColor: This is the color of those areas where SSS contributes, especially on the ears, nose, and mouth area. The melanin color.
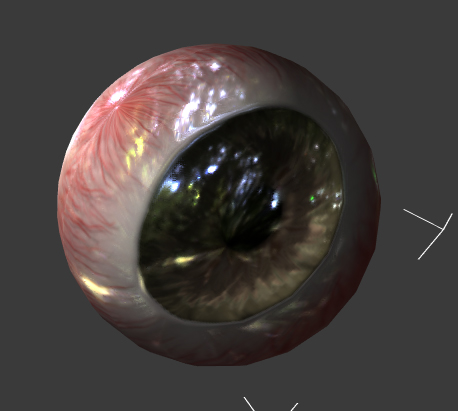
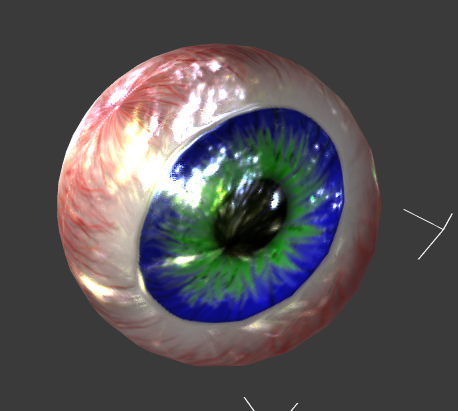
eye (Download)
The eye shader is designed around two philosophies seemingly at odds: visual fidelity, and variation with low overhead. The same eye shader and set of textures provides 4 eye "types" with an infinite number of colors. Adding a single 256x256 RGBA texture provides a whole new set of 4 eye types. So, instead of having 10 eye textures for 100 characters and having repeating eyes, the same 10 textures can produce 40 100% unique eyes, and the rest of them with 100% unique eye colours.
The variation is achieved with an RGB texture that does not control diffuse colour, but are masks for externally-set diffuse colours. The inner iris, outer iris, and veins all have a unique colour that can be set differently for every single eye with absolutely no hit whatsoever to performance. On top of this "colour comp" is applied one of four "overlay" channels from an RGBA texture to give finer detail.
Visual fidelity is handled in two parts. The first, is the cornea (the whites of the eye). The ambient colour controls the overall reflectivity of the unlit areas of the eye. There is a variable for biasing the diffuse lighting. A normal map creates the "bulge" of the cornea over the front of the eye and iris. Most importantly, the specular highlights are multiplied by a reflection map, which breaks up the specular highlight. Because eyes are 100% reflective, they clearly reflect the shape of their light source. Thus, the traditional round shape of the specular highlight looks "fake." The broad specular broken up by the reflection map (which has brightness and contrast controls) approximates an image-based lighting approach very cheaply.
The second part is the iris. The iris' specular highlight is broad, and takes the colour of the iris. The inverted normal map is used to approximate the "inverted hemisphere" of the iris, that recedes from the eyeball's spherical surface.
rgbTexture: R channel holds the vein color mask, G holds the inner iris colour mask, B holds the outer iris colour mask.
overlayTexture: Each channel (RGBA) holds an overlay texture that is multiplied over the eye's base colour (after the application of the eye colour variables to the rgbTexture masks).
normalTexture: Should have a "bulge" out in the iris area.
reflTexture: The cube map that is the ambient reflection and breaks up the specular highlight. For best results, should have areas of strong contrast, and irregular shapes (such as, a forest).
electricSkin (Download)
Here is the shader I placed third in the nVidia "Shade your world" contest with. It is really many iterations on the same idea, of interesting ways to animate textures just with UV's and combine a variety of 'self-illumination' techniques, always keeping in mind texture space and memory by using every single channel to its fullest. I won't give a long explanation, since the idea is simple as I've already said, and the implementation of each effect is best learned by reading the code I've tried to document well.
parallaxOcclusionMapping (Downloads Below)
I took the ATI Toy Shop POM shader and converted it to work in 3dsmax and FXComposer. The example shaders just use basic Phong lighting. I've also wrapped all the POM math into a couple nice functions. This way, you can easily turn them on/off, and combine them with whatever lighting solution you want (Blinn, Phong, Anisotropic, BRDF, etc.), many of which you can also get from my Common Functions page. The 3ds version has some of these lighting functions available to aid artists, who may not be able to edit the shader themselves.
Check out the Functions page for a neatly wrapped POM function.
All-in-One Shader (Download)
I've created a DirectX version of an uber-shader using most of my Common Functions. Jack of all trades, master of none, it does include Normal, Offset, and Parallax Occlusion mapping, and most/all of the algorithms found on my Functions page. It mostly works, but will continue to undergo improvements as time goes on (I didn't have enough time to test as thoroughly as I wished). Please email me if you find something broken and I'll fix it immediately.
(Download includes helper .hlsl files that must be in the same folder as the .fx file)
Shader-Driven Animation (Project Page)
I've created a DirectX version of an uber-shader using most of my Common Functions. Jack of all trades, master of none, it does